Last weekend we tackled a quick but significant quality-of-life project in between all our other projects! We did a quick LED recessed lighting installation in our living room, as well as putting in a new ceiling fan!
This post may contain affiliate links, which means we may receive a commission, at no extra cost to you, if you make a purchase through a link. Please see our full disclosure for further information.
We had no ceiling lights in our living room, and our hodge podge of Goodwill floor lamps just don’t cut it. So this was a project that we have been looking forward to since we bought the place. Our ceilings are only 7’7” so it was a no-brainer to use recessed lighting instead of fixtures that would make the room seem even shorter.
We also have a fairly poor layout for the locations of our floor vents, and since we are on a slab, there is no way for us to modify that at all, so we needed to do something to help with air circulation. That is why installing a ceiling fan was also high on our priority list. Even without changing our thermostat, the circulation of air conditioned air is so much better. We also did not want the ceiling fan to take any more height off of the room than absolutely necessary, so we got a flush mount fan with no light fixture on it. We also did our research for what “wingspan” of fan we needed for the room to make sure we were getting enough bang for our buck.
With all of our shopping done the day before, the recessed lighting installation did not take long at all, and installing the fan, though tedious, also wasn’t too bad either. Let me walk you through what the process looked like, and I will include links to where you can find both main products through Amazon.
LED Recessed Lighting Installation Process
Choosing Layout
Deciding on the layout for our lights probably took longer than any other part of the process. We had a set of six lights but we really weren’t sure if we wanted 4 or 6 for the living room. The space is not much separated from the kitchen and dining room, which each already have different types of lights, so we didn’t want the ceiling to look overwhelming. In the end we did decide to go for using all six lights in the living room and we both agree that that was the right decision.
You can find a lot of suggested layouts for recessed lighting installation on Pinterest or even just on google.
Marking and Cutting Ceiling Drywall
Once our layout was chosen, we used a laser level and a measuring tape to make little pencil marks on the ceiling for the center of each light. The set of recessed lights came with a circular cardboard stencil with which to trace a circle on the ceiling to cut so that your light fixture will fit perfectly and it completely removes the guesswork!
Once the circles are drawn, we used our Dewalt multitool to cut the drywall. This was fairly straightforward and didn’t take more than a few minutes to cut all six. The only places were difficult were places where part of the cut overlapped with part of a ceiling joist. But luckily we already knew where those were (thanks to a stud finder) and we knew that the puck style light would still fit because it is just as slim as the drywall.
Running Wire
Running the electrical wire for these was probably the most intimidating part since we have done very little electrical work in the past and we have very minimal experience. But hey, that’s what DIY is about – learning new skills and forgetting why you were ever afraid!
Our hallway light switch was in a perfect place to add switches for the lights and the fan. There was room to put in a three gang box and there is very little else on the same circuit for the breaker. For these lights, since they are dimmable, we connected the existing hallway light switch to a dimmer switch from the same breaker. We connected a very long segment of our electrical wire (rated for indoor light fixtures) to this dimmable switch and then daisy chained the rest of the lights to the first one.
From the attic we pushed about an 8” loop of wire through each of the six holes for the recessed lights, and then the rest of the wiring could thankfully be done from the living room. (Our attic has blown in insulation so even with a mask on, being in the attic is not just a hot situation, but an itchy one!)
Connecting the Electric
Attaching these particular LED recessed lights to the electrical wire is actually quite easy. We cut each of the loops of wire we had pushed through the ceiling, stripped the outer casing back about 2 inches, stripped each of the 3 interior wires about ¾ of an inch, and then all we had to do was push the exposed copper ends into the corresponding black, white, or copper connector inside the small electrical box. They come fully equipped with these connectors, so you don’t need to use wire nuts or anything separate.
Once all the white wires are linked together, the black together, and the ground together, you simply close the box, use electrical putty to secure the wires in the box so they won’t pull out, and you’re done wiring! The box can easily be set up into the attic through the hold, and a small white wire with a plug attachment is easily accessible.
Attaching the Lights
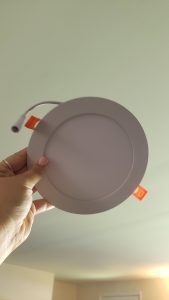
Each of the LED lights then connects by a small white wire plug to the box you just wired. There are two small tabs on either side of the disk light that you push back as you press the LED recessed light fixture into the ceiling drywall. If your hole wasn’t cut quite enough, resist the urge to just force the fixture in, as you can crush your drywall. Instead, cut the circle a little wider so the light will fit easily. If you plugged in your fixture before inserting it into the ceiling then believe it or not, that light is done!
By this part of the project we were so excited to be almost finished, so we flew through the rest of the recessed lighting installation, and moved on to working on the fan.

Ceiling Fan Installation
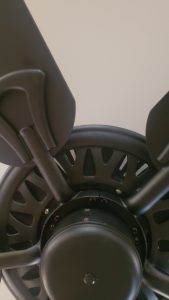
Installing the ceiling fan was even more straightforward than the lights and took less time. It was tedious because one of the screws was damaged and there are no extras included. So we had to grind off a portion of the end of one screw in order to mount the final fan blade so we wouldn’t have to go find a similar screw at the hardware store.
Cutting and Wiring
The process for cutting the drywall and wiring the switch were the exact same for wiring the fan as for the lights. We put in a single switch for the fan directly so it is not connected to the lights at all, so there are now three switches in the box. The wiring then goes directly from the switch to the fan with nothing else connected.
Connecting and Attaching the Fan
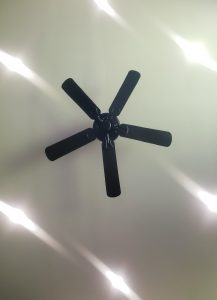
The fan did have to be connected with wire nuts, which were included with the fan. The fan we used can be flush mounted or have a 4” downrod, but we selected to use it flush mounted. It also has two different finishes on the blades so you can have either matte black or a dark wood grain. We love wood grain but we already have wood grain laminate flooring which we will be installing in the whole house, and the color doesn’t match that at all, so we used the black. It also matches many of our other accents and fixtures. The fan came with instructions that make installation easy and self explanatory. If it wasn’t for the damaged screw it would have been a ridiculously quick install.
Products We Used
There are a lot of options for both LED recessed lighting and ceiling fans, of course. We were trying to strike a balance between quality and price point. That’s pretty much what we shoot for with all our projects. The brand we went with for the LED recessed lighting was Energetic and we ordered through Amazon Prime so our shipping was free and we got it within 2 days. The fan we also found on Amazon but we weren’t completely sure we wanted it until we saw it in Lowes, so we just bought it there. But it is a Harbor Breeze 52” flush mount.
Review
It has only been a week since we did this project (and it miraculously stayed a one day project!) but so far we have no complaints about either! We love the functionality of both products, and the aesthetic appearance leaves nothing wanting either! I think my husband is more excited about the lights and how they improve the room. As the resident person who always thinks it is not, I am personally more excited about the ceiling fan!
Hopefully this gives you a pretty good idea of how easy LED recessed lighting installation is as well as the ceiling fan installation. We had never done either of these projects before and it went really well, so if we can do it, you can do it too!
If you are thinking about it and aren’t sure if you can manage it, let us know what part worries you and we will do what we can to explain the process better and help you be confident in pulling it off! And if you use this breakdown to figure out how to install your lights or fan, please let us know!
Congratulations on managing this project, Tessa and Jefferson !! Your explanations seem pretty clear. Thank you for helping us other DIYers out here.
Thank you! That’s our goal! 🙂