If you thought that finding a mountain mural tutorial that is easy to follow and understand was going to be a challenge, try this one and see what you think!
This post may contain affiliate links, which means we may receive a commission, at no extra cost to you, if you make a purchase through a link. Please see our full disclosure for further information.
Girls’ Bedroom Reno
When we started renovating a room for our two girls, we were initially just intent upon creating a livable space for them outside of our bedroom. At the time all four of us were sharing one bedroom because the rest of our 3 bedroom house was all but unlivable. We were incredibly eager to change that and have the girls move out of our room so we could have it to ourselves again.
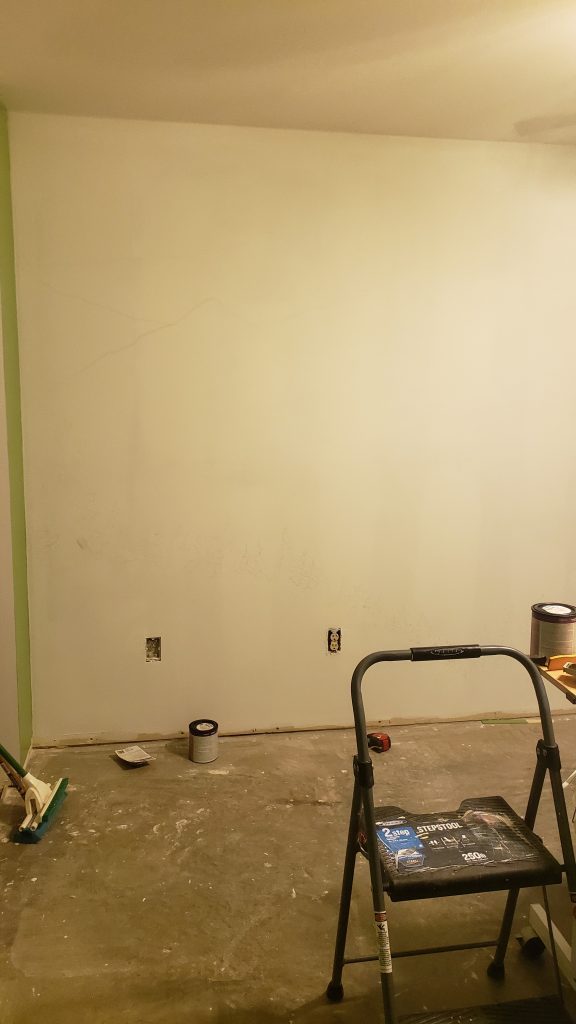
We began by doing a lot of necessary but not-that-fun aspects, like ripping out terribly disgusting carpet that I was severely allergic to, fixing drywall holes, reattaching droopy drywall to the studs and removing popped nails, and eventually skim coating the textured ceiling to get it nice and smooth. We replaced the existing fan and light fixture, as well as some other small electrical projects, and then we were finally ready to paint the room.
Our two year old’s favorite color is green, and she is obsessed with wild animals, so we decided to let her have a green room. This is when it occurred to me that we should paint a wall mural while we were at it. After all, a solid, completely green room would probably drive me nuts eventually.
So Jefferson, being the resident artist in the family, drew up plans for our mountain wall mural with just a few pointers from me to give him an idea of what I had in mind.
Mountain Mural
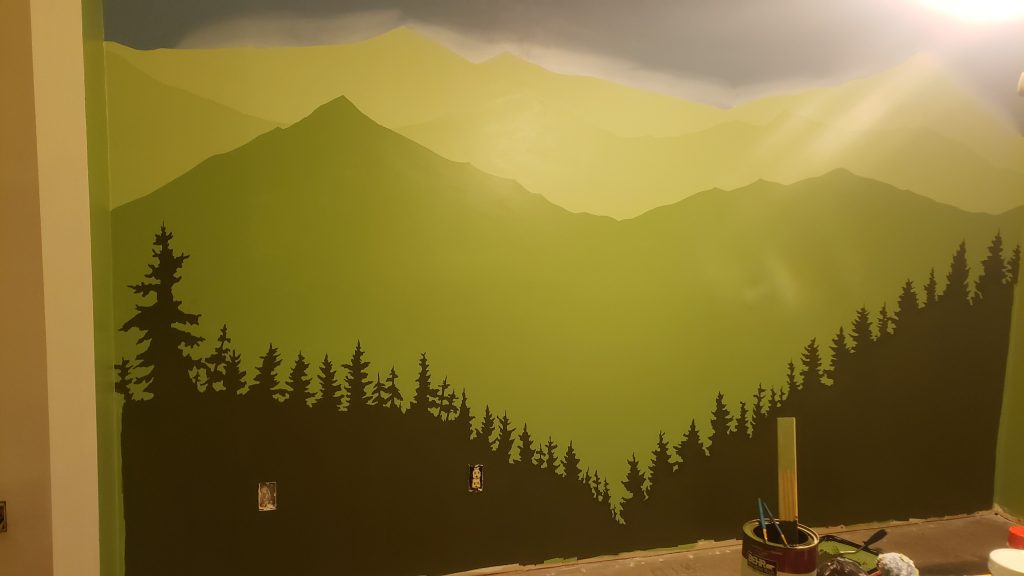
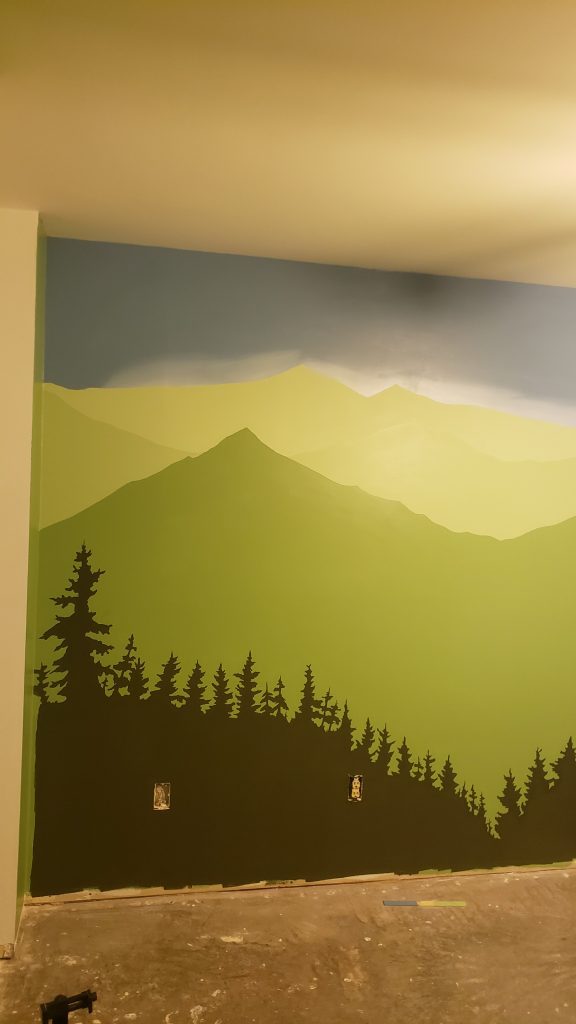
My main concept for how this would look was that it would have several tiers of mountains fading off into the distance. That’s where we began with our concept art, and it wasn’t until later that we thought to add in a row of trees in the front. At the time I was intending to do the majority of the mountain mural painting, but I wasn’t quite confident in my ability to paint small details and have them turn out nicely. Jefferson assured me that he would eagerly paint all the painstaking tree details, so we added that in.
We also wanted a blue sky as a background to offset all of our green. When I looked around the internet for mountain mural ideas, I realized that I wanted more detail than simply painting large colored mountain triangles, but I didn’t want to get into any level of shading, snowcaps, or anything intricate.
I wanted it to be a basic process that I couldn’t mess up.
So here’s your basic tutorial for a DIY Mountain Mural.
DIY Indoor Mountain Mural Tutorial
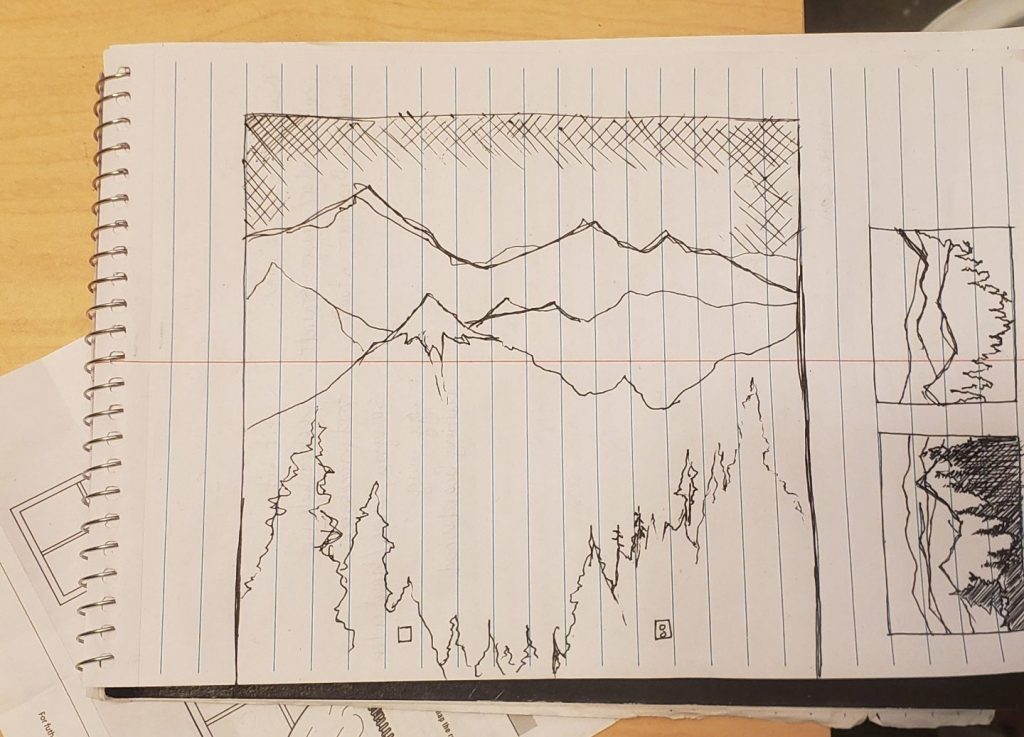
Step One: Mountain Mural Concept Art
After discussing what we thought we wanted the wall to look like is when my husband drew up a simple sketch of the room. This was to give us both an idea of what it would look like and to make sure we were on the same page. It is also a lot easier t otweak any part of the concept before transferring the drawing to the wall.
The drawing Jefferson came up with was simply perfect and only made me more excited than ever. Choosing colors we loved was the next part of creating our concept art.
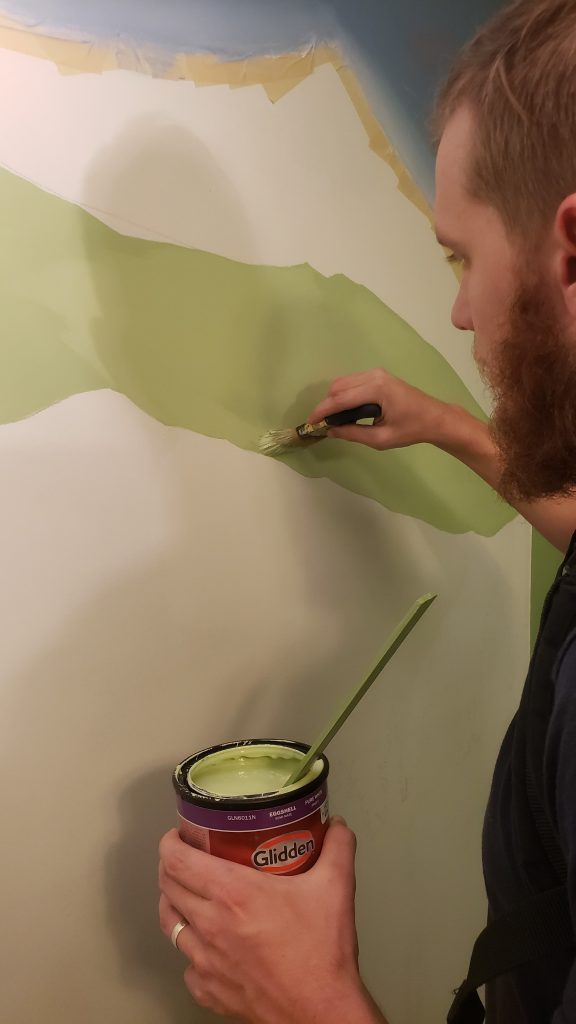
We went to Home Depot and, knowing we already had one color of green paint that covered the rest of the room, we chose one darker color for the tree line, and one lighter color that we would then mix with white on our own to achieve a third green level for the mountains. We also chose a soft blue color for the sky.
So all we had to buy that we didn’t already have for the room, was 2 small sizes of 2 different green colors, and a single blue.
Step Two: Transfer the Mountain Mural to the Wall
Transferring the sketch to the wall can be done different ways depending on how closely you need the wall to match your sketch, or by how much of a perfectionist you are!
Some people opt to use a projector to project their exact image onto the wall in order to trace the image before beginning to paint. We do not have a projector, and while we could have purchased one (which I want to do in the future regardless, especially since we don’t have a TV) or borrowed one from friends, Jefferson has a background in fine art (you can see his acrylic and oil paintings here) he opted for a different method.
Our method was simply to eyeball the general proportions from our sketch and pencil it directly onto the wall. Jefferson did this and it looked beautiful! I cannot even remember if he had to erase anything or make any adjustments. The sketch on the wall was close enough to our concept art that we didn’t feel that any more elaborate method would be necessary, so we stuck with it.
Step Three: Tape Edges or Cut in Freehand
Jefferson only taped one line in this process, and that was between the highest mountains, and the clouds, since the blues and greens would be a more noticeable contrast. However, after doing it, he said he wished he had just freehand cut in for those lines as well. But as you can see in the image, he also did some sponge style shading with some white overtop of the blue sky to give the appearance of clouds or mist rising.
The rest of the mountain ridges and the corners of the wall were done freehand, and you can do that too! Just take your time, and know that if some parts take on a slightly different shape to your mountains than you initially planned, then you can either wait for it to dry and then come back with the other color to adjust, or you can just roll with it, because mountains are mountains.
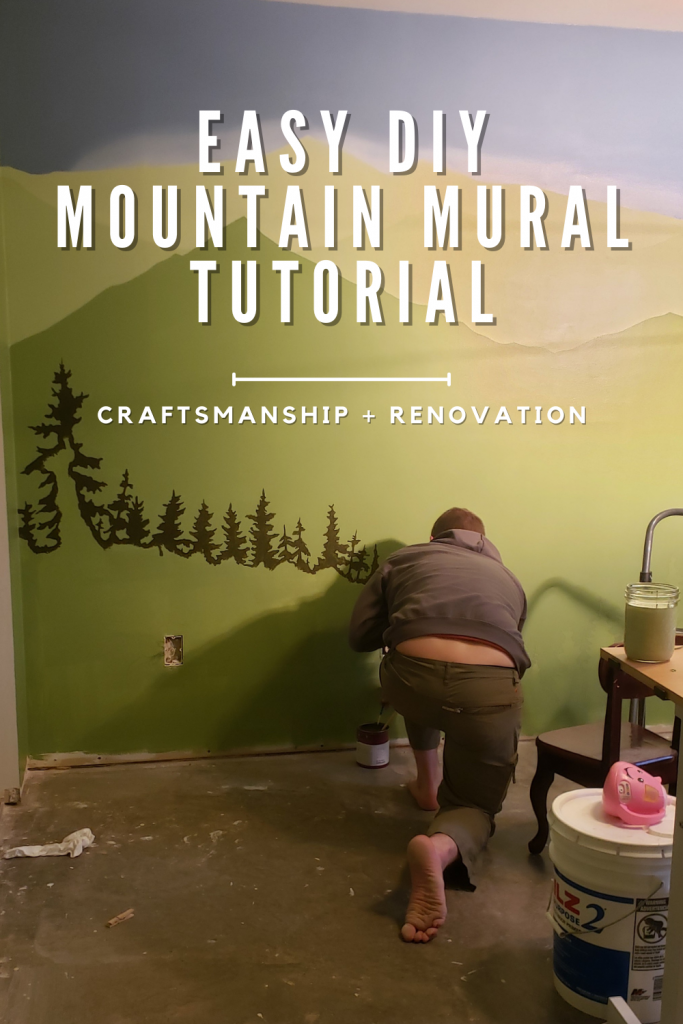
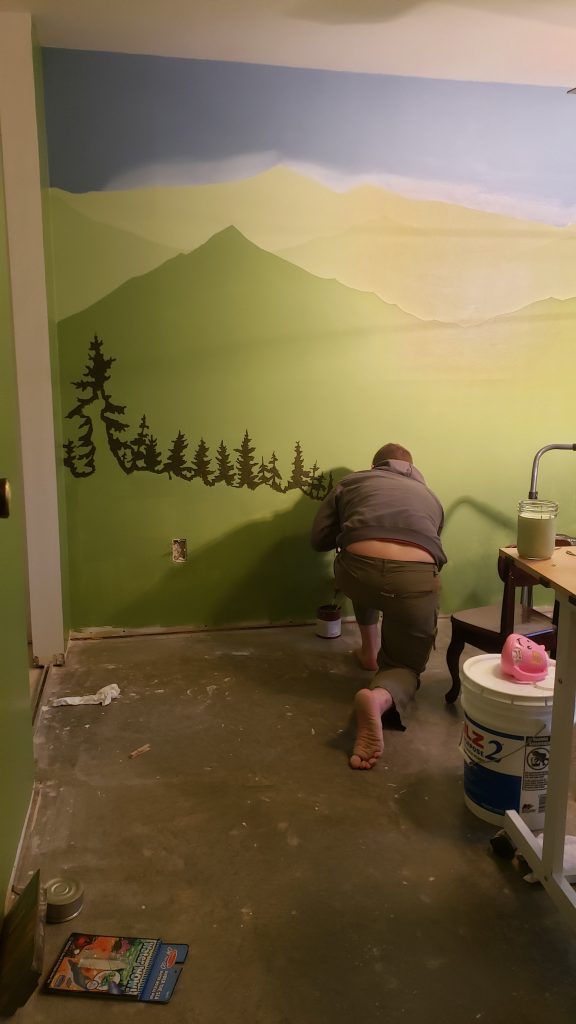
Step Four: Adding Trees
If you plan to add trees, it is best for them to be in your darkest color so that it hides the mountain color behind it, and it’s best to draw those in last on top of the already painted mountains. This will allow you to still see your pencil lines instead of having to redraw them once they’re covered in paint.
We painted these trees with regular small artist paint brushes as opposed to cutting in brushes that we used to hand paint the rest of the wall. (You could also roll the majority of the wall, but there will be a different texture or finish between the rolled areas and the cut in edges of the mountain ridges, so we hand painted the whole thing.)
Painting the trees was definitely the part of the process that took the longest, but it was also the part that was the most satisfying to enjoy after the fact. And the color we ended up using for that bottom tree line is my favorite of all of the greens we used. (I’ll list all of the paint colors and materials at the bottom of this post!)
Step Five: Dry, Recoat, or Touch Up Where Necessary
The next day after the mural had time to dry, we went back through and touched up any tiny spots that needed a little more color or had a couple of mistakes. There weren’t many places that needed help, but those finishing touches are always so satisfying to accomplish.
It’s always a good idea to write down or keep small paint samples from a project like this in case the wall gets scuffed or damaged and you need to do touchups in the future. We definitely kept some of each color on hand, especially since this room is now home to a 1 year old and a 2 year old. While they are both girls, this doesn’t mean anything at all about how rough they can be on their surroundings!
Mountain Mural Complete
Taking a step back and the end to revel in your beautiful mountain mural is the best part. Hopefully this mountain mural tutorial was helpful in giving you the inspiration and step by step process for painting your own indoor wall mural. It can be challenging at times but it sure is a fun process and believe me when I say that your friends will be impressed!
Check below for a list of the materials we used while painting this wall mural as well as the colors of paint we chose.
Materials and Paint Colors
- Bottom Tree Green: Glidden Eggshell in
- Next Up Main Wall Green: Glidden Eggshell in Guacamole
- Third Up Green: Glidden Eggshell in Quaking Grass
- (Fourth green is the same as 3rd green with some white added to lighten, sorry I don’t have ratios!)
- Blue Sky: Glidden Eggshell in Walden Pond
- Paint Brushes
- Artist Paint Brushes
- Small Paint Roller
- Paint Sponge for sky
- Painters Tape
- Optional projector